MB6582 Control Surface Troubleshooting
This section is about the MB6582 control surface trouble shooting based on the PCB version 2.0. Please note that inappropriate working control surfaces may have a fault on the control surface PCB as well as on the Base PCB. Therefore it is important to disconnect the CS PCB from the base PCB in order to separate the root causes of the various possible faults.
It is also recommended to use this guide to verify the function of your control surface during the build process. This will help you to identify faults early during the assembly process and will make you live easier while testing the completed synthesizer.
The following acronyms are used in this section:
CS = Control Surface PCB = Printed Circuit Board
There are different root causes on the CS PCB leading to an inaccurately working control surface. Please find an overview of the most common faults:
- Shorts → caused by the midiboxer
- Bad solder joints → caused by the midiboxer
- Defective components (switchsed, LED, diods, encoders) → component manufacturing issue
- Broken interconnection points (between the bottom and top side) → PCB manufacturing issue
- Shorts or breaks on the boards → PCB manufacturing issue
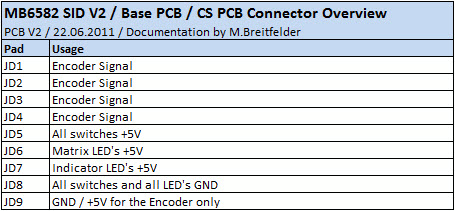
The first step to do a successful trouble shooting is to understand the design of the CS PCB. Attached you will find an overview of the usage of the connection pads between the CS and the Base PCB:
Please note that the all switches and all LED’s are sharing the same GND pad JD8 ! This is important to understand because if you have shorts between JD8 tracks you will find that a series of switches or LED’s are not working properly. In this case the MB6582 firmware will not be able to distinguish between switches connected to the faulty tracks. Also all the LED’s connected to the faulty tracks may light up together. It is also very helpful to understand that the encoders are using exclusively the pads JD1 to JD4 as well as JD9 ! If you find encoders working inappropriately you just need to check the rails on these pads.
The following steps are recommended to be carried out during the trouble shooting. Please make sure that the CS PCB is NOT connected to the Base PCB !
Check of the single components:
- LED’s → Check all the LED’s on the CS PCB. This is necessary to check that they are all oriented appropriately and functioning as expected. To do this you can built yourself a cable that you connect to the LED connector on the Base PCB.
- Switch Diodes → Use your Multimeter to check that all the diodes are working properly. You just need to select the diod test function on your multimeter. You need to connect the anode to the plus (red) lead and the cathode to the minus (black) lead. The multimeter will show you the forward current. Even the cheapest Multimeters offer a diod test mode to check switch diodes. Check also the orientation of the diodes. The black stripe on the diode should match the bar at the end of the arrow symbol on the CS PCB.
- Switches → Check the “routed through” connection on the long sides of the switch. Then Check that each switch is closing when pressed as expected (short sides of the switches)
Once you have checked the components separately you can continue with testing the function and connection of each component. The following overview tables will guide you through each component to be verified:
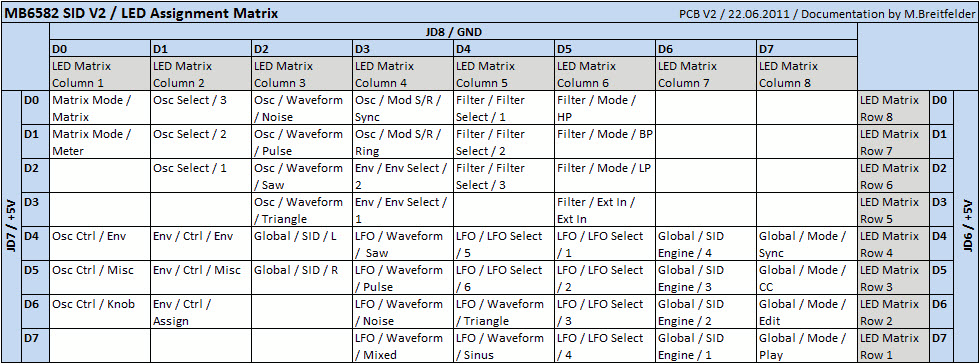
LED Assignment Matrix
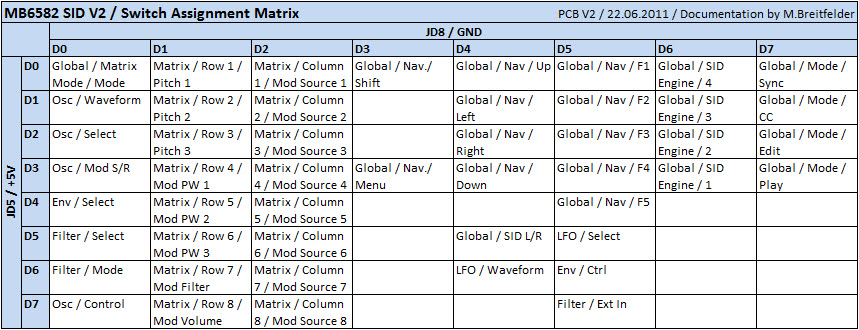
Switch Assignment Matrix
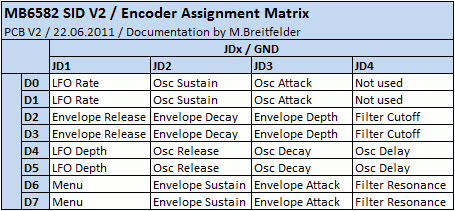
Encoder Assignment Matrix
Check the function of each component on the CS PCB:
- LED Matrix –> Use the cable described in point a) above to check the wiring from the connection points. You need to connect the GND wire to one connection point on the JD8 pad and the +5V wire to one connection point on the JD6 pad. Please use the LED Assignment Matrix shown below. You need to check all 64 combinations to make sure that the complete matrix LED’s are working appropriately. During this test only single LED’s should light up. If more than one LED’s lights up then you have got a short on the PCB.
- Indicator LED’s → Use the cable described in point a) above to check the wiring from the connection points. You need to connect the GND wire to one connection point on the JD8 pad and the +5V wire to one connection point on the JD7 pad. Please use the LED Assignment Matrix shown below. You need to check all individual LED’s to make sure that they are working as expected. During this test only single LED’s should light up. If more than one LED’s lights up then you have got a short on the PCB.
- Switches → The function of the switches can easily be tested with the diode mode on your Multimeter. You need to connect the GND wire of your Multimeter to one connection point on the JD8 pad. The positive wire (red) has to be connected to one connection point of the JD5 pad. Please use the Switch Assignment Matrix to identify the correct connection point on the JD8 and JD5 pads. You should now press down the switch and check on your Multimeter display if it is working appropriately. With this check you won’t be able to identify shorts on the GND part of the board. To exclude shorts on the JD8 GND pad you need to measure the resistance between each connection point on the JD8 pad.
- Encoders → The encoders are connected to the connection pads JD1 to JD4 as well as JD9. Please refer to the Encoder Assignment Matrix and the Base PCB / CS PCB Connector Overview. You can used the continuity mode (2K Scale) to check the encoders. You need to connect the wires from the Multimeter to the connection points of JD1 to JD4 as well as JD9.
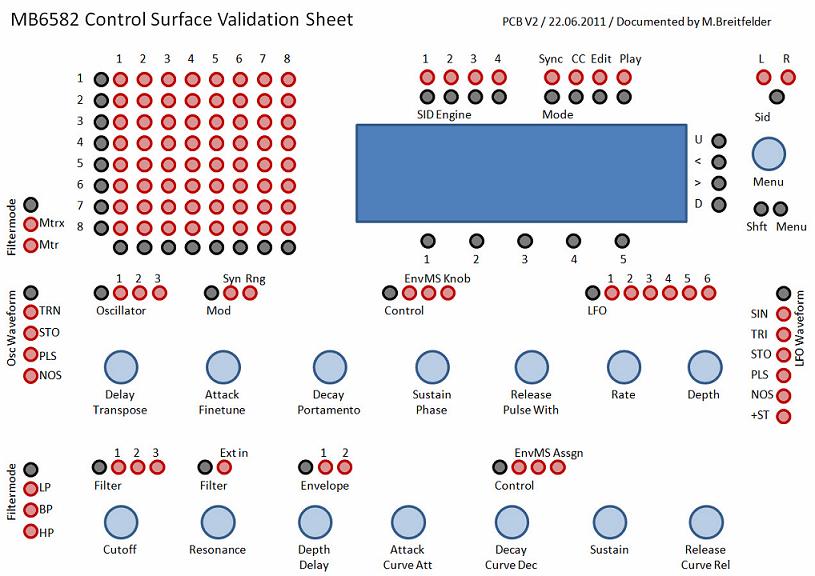
If you haven’t found any faults so far you can start testing your CS while connected to the Base PCB. Please use the following verification sheet to test the function of each component of the control surface:
You should walk through all components ! Please document your test results on the validation sheet in order to support the later troubleshooting in the forum.


